Guide
How to split a long screenshot into readable PDF pages
Use Split tall images in the screenshot-to-PDF tool. Choose A4 or Letter and a margin, then inspect the page previews before downloading. The image is scaled to the page width and divided vertically instead of squeezed onto one sheet.
Convert the image
- Choose the screenshot
Open the free converter and select, paste or drop a PNG, JPG or WebP. Add any other images you want in the same document.
- Set the reading order
Move each image up or down until the preview order matches the story. Use redacted exports if the screenshots contain sensitive details.
- Choose paper and splitting
Select A4 or Letter, set the margin and choose Split tall images. Fit each image to one page is useful for short screenshots but makes long ones tiny.
- Inspect and download
Review every page, especially the first and last source rows. Download the PDF and open it in a viewer to confirm the file you will send.
How page width controls readability
The printable width is the paper width minus the two margins. The converter scales the screenshot to that width and uses the printable height for each slice. Wider margins leave less room for the image.
For example, A4 is approximately 595 × 842 PDF points. With a 24-point margin, a 1200-pixel-wide image uses about 547 points of width. Each page can represent roughly 1741 source pixels vertically. Actual boundaries use integer image rows.
Check the page boundaries
A screenshot has no knowledge of paragraphs or table cells. A page break may cut through a line even when every source row is included. Inspect adjacent pages together and consider splitting the original image at a heading if the presentation needs a cleaner break.
Use the numbered-row fixture to check the sequence. Every row number should appear in order, including the final row. Repeated overlap from separately captured images should be intentional and documented.
Understand the text and privacy limits
The free converter creates an image PDF. It does not add searchable OCR text, recover missing source content or restore links. To copy the words, extract them separately with the image-to-text tool.
Processing takes place in the browser. Very large inputs are bounded to protect browser memory; split an oversized capture into smaller files if the tool reports its limit.
If the PDF is still hard to read
Open a real five-page example
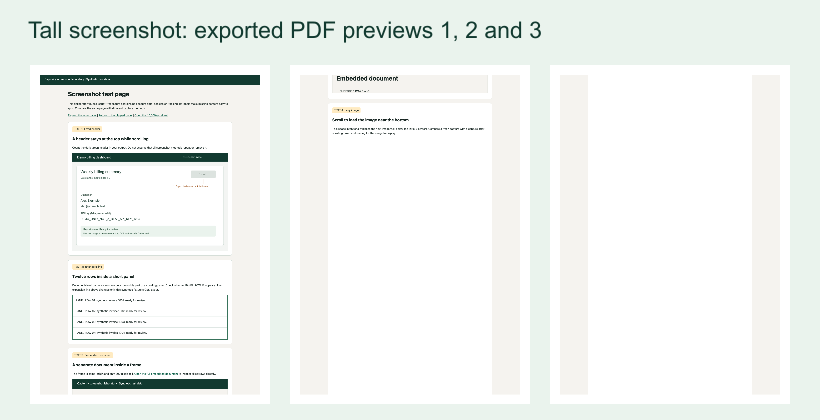
Our loaded example page produced a 1280 × 7915 screenshot. The converter split it into five A4 pages with 24-point margins. The first three previews appear below, and the download contains all five pages.
The original screenshot retains the default clipped inner panel. Pagination preserves the source pixels but cannot reveal the rows the screenshot never captured. Use the panel expansion procedure before capturing when all rows are required.